Learn How To Make Soy Candles at Home

How to make soy candles at home. Simple instructions for amazing results. It's Candle Making Time!

Learn how to make incredible soy candles at home. Simple instructions for amazing results. It's Candle Making Time!
  • Home
  • The Soy Candle Making Book
  • Blog
    • Business
    • Recipes
    • Supplies
  • Resources
  • FAQ
  • About
    • Contact
  • Advertise

Soy Candle Making Instructions!

Find lots of soy candle making instructions right here! Learn how to make several types of beautiful soy candles that can be used for personal use, as gifts, or to sell.

Soy Candle Making is Fun!

Making soy candles is a fun and rewarding hobby or business and you will find tons of information here on this site to ensure that you get off to a great start in your soy candle making venture. Be sure to check out my videos, Frequently Asked Questions page and where to buy your supplies.

I hope you enjoy all the wonderful soy candle making recipes below. Remember, don't be afraid to experiment and be creative with your candles too!

Make sure to get a copy of my new eBook "The Soy Candle Making Book" for even more recipes!


Light Up Your Evening-DIY Floating Candles Centerpiece

September 10, 2014 by SoyCandleMakingTime 2 Comments

Floating Candles Centerpiece

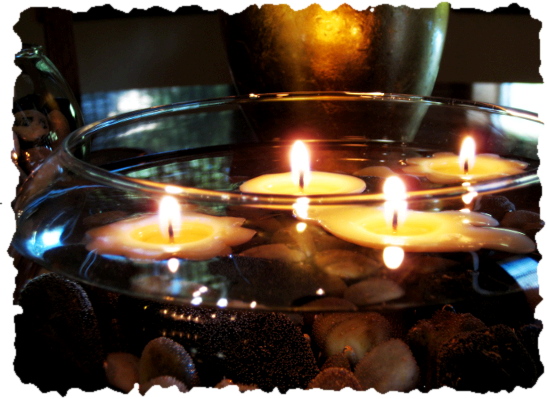
There’s something about candles floating on the water that gives off a peaceful and even romantic feeling.  The flickering flames reflecting on the water, gently floating. Pair that with a creative bowl and maybe some decorative rocks or shells or whatever else you can think of, and you have yourself a lovely centerpiece!

So, I tried making these floating candles the other day for the first time, and they turned out really well. One thing though, I used a Votive/Pillar soy wax for these and they didn’t burn very long. The votive/pillar blend is a harder wax so the tealight wicks that I used were not hot enough to melt the wax far enough across, so the little candles basically tunneled.

I thought I would try doing half votive wax and half 100% soy wax so they would still come out of the molds easily but hopefully burn longer. That did the trick! I think you could probably even do 75% soy container wax and 25% votive/pillar soy wax and that might help them to burn even a bit longer.

Lets get to making some floating candles shall we?

Supplies:

  • 8oz of votive/pillar soy wax or even better, 4oz 100% soy container wax and 4oz votive/pillar blend soy wax
  • Several tealight wicks
  • Metal tart molds and/or some other type of molds that are wider at the top where you’ll be lighting the wick so they float nicely. You can find some candy molds at stores like Michaels crafts or Hobby Lobby or look on Amazon for “floating candle molds”  or “candy molds” (Make sure the molds are at least 1/2″ deep) For fall, you might try looking for Fall Candy Molds (the Amazon links are affiliate links so I do make a small commission if you visit those links and place an order)
  • Metal pour pot or metal bowl for melting the wax
  • Metal cooking pot with some water in it
  • Digital scale (any kitchen scale will do, but digital is best)
  • Rubber spatula that can withstand higher heat
  • Candy thermometer
  • 1/2 oz of fragrance oil of your choice
  • dye (optional)

Need to know where to buy supplies? Click Here

Instructions:

S1670005
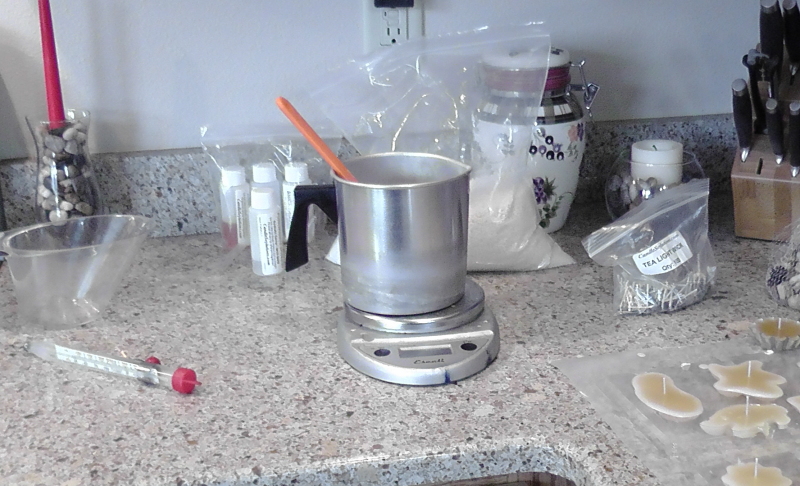
Whether you are using only votive/pillar wax or part votive/pillar and part 100% soy container wax you want to set your pour pot on the digital scale, zero out (or tare) the scale and measure out your wax, pouring it into the pour pot or metal bowl.

Next set the pour pot into the cooking pot that has about an inch or more of water in it, or set your metal bowl on top of a pot with water (double boiler style). Make sure your candy thermometer is in the wax and melt on medium-low heat until the wax reaches about 180 or so degrees. Don’t let it get above 200 degrees F. or it can cause discoloration of the wax and may cause the candles to  burn incorrectly.

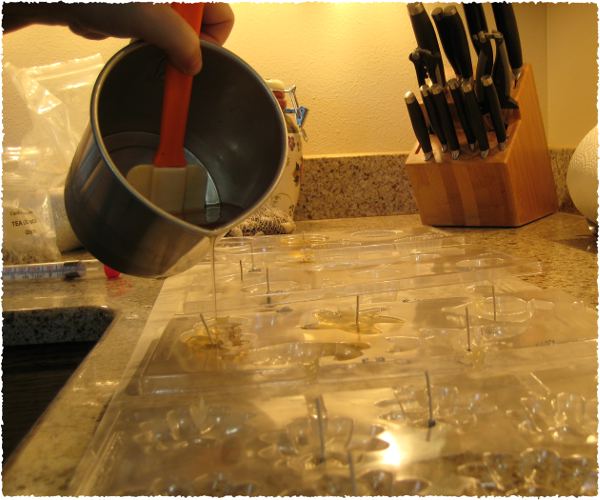
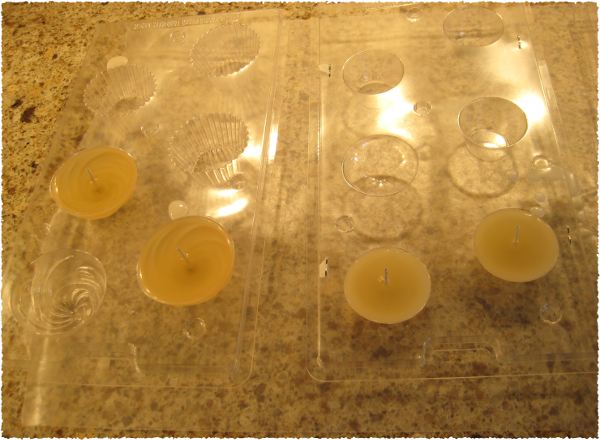
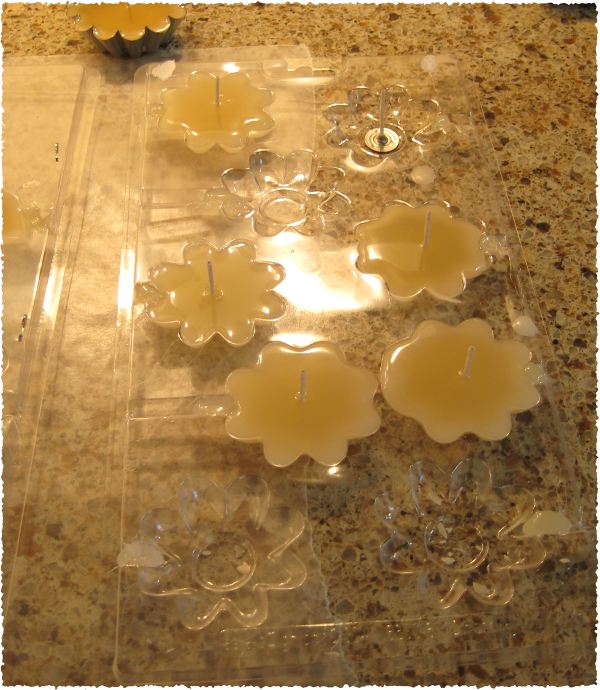
Make sure your molds are set out on some wax paper and set one tealight wick in each mold. The amount of candles you’ll get will depend on what size your molds are, so just get several molds ready and see how far the wax goes.

Once the wax is at 180 degrees or so, take it off of the burner and set back onto the scale. Zero ouPouring fragrance oil into wax
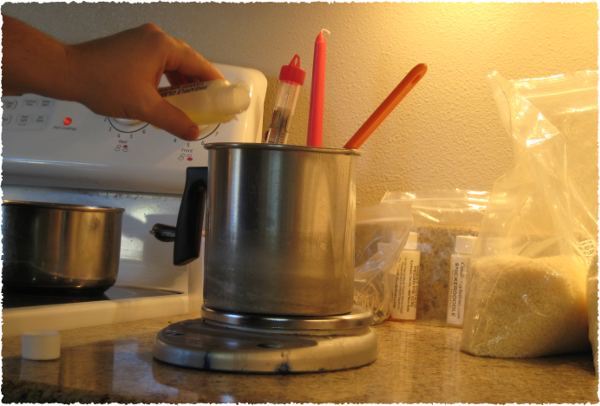
t the scale again and then add your 1/2 oz of fragrance oil and dye (if you are using dye) and stir slowly but well.

Stirring slowly ensures air bubbles do not get incorporated into the wax.

Now if you are using plastic candy molds like I did for most of my floating candles, it would be best to let the wax cool to 160 degrees before pouring, otherwise if you are using the metal tart molds you can go ahead and pour as soon as you’re done stirring the fragrance oil and dye into the wax.

You’ll probably need to readjust the wicks since they tend to move around as you pour, so just do that once you’ve finished pouring into all your molds.

Allow the floating candles to cool completely and cure for at least 24 hours before burning. For better scent throw when burning you may want to allow to cool for 48 hours or longer.

Pouring the wax….

Pouring Soy Wax for Floating Candles


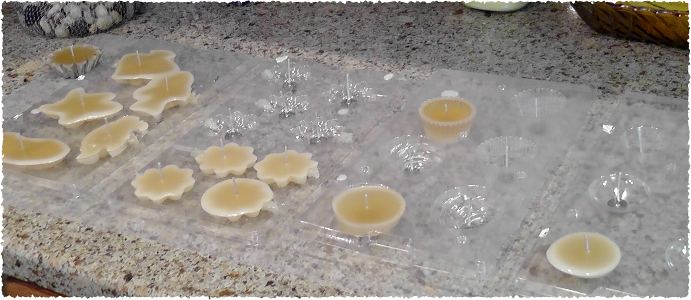
Allow the floating candles to cool completely…..

Floating Candle Molds


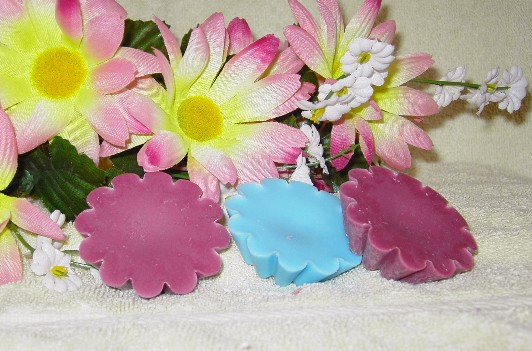
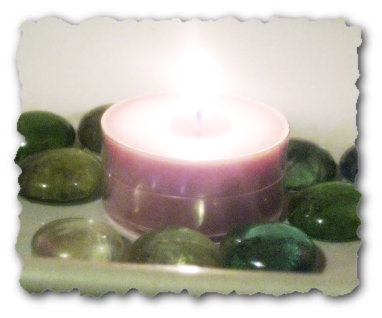
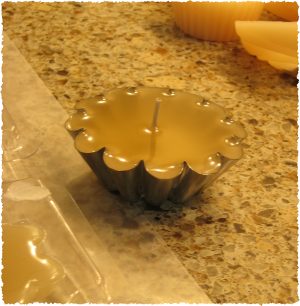
This is the metal tart mold, the longest burning out of these candles…..

Metal Tart Mold Floating Candle

These are actually molds to make hollow mini candy cupcakes. The mold on the right would actually sit on top of the mold on the left to make a cavity in the cupcakes. I thought they would both make good floating candles 🙂  The cupcake tops on the left worked out really well, but the bottoms wouldn’t float (those are the 3 empty ones on the top half of the plastic mold ont he left). The shallower 3 cavities on the bottom right (I only have 2 filled) worked well too, but of course didn’t burn as long (maybe 1.5-2 hours) as the ones on the left.

Cooling Floating Soy Candle Wax

These are actually candy lollipop molds so I had to fill in where the lollipop stick would go. I did that with hot glue. You definitely have to be sure not to overfill these with the soy wax or they will not look as nice.

Floating Flower Soy Candles Cooling

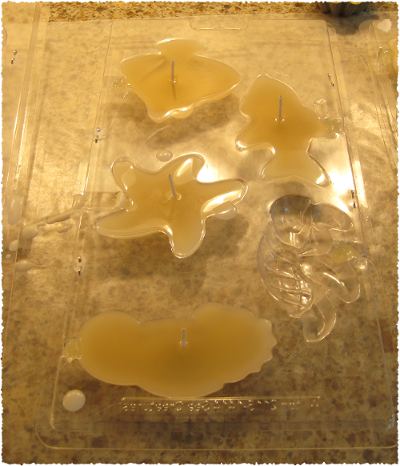
These are also candy lollipop molds so I had to fill in where the stick goes with hot glue on these as well. These are pretty neat because they are ocean creatures. It would be nice if the detailed part was on the top, but it just won’t float that way! oh well, they still look nice in the bowl.

Sea Creatures Floating Soy Candles

When the candles are completely cooled, you can pop them out of the molds easily!
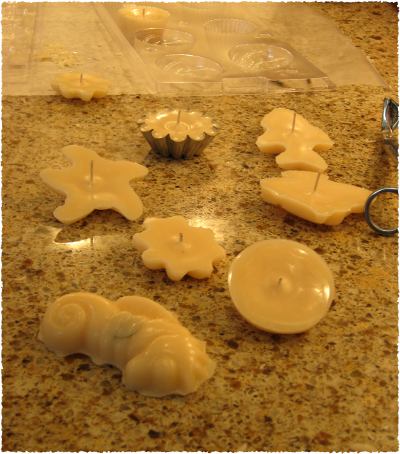
Floating Candles Out of Molds

Ready to test!

Your floating candles are nice and cured and you’ve popped them out of the molds. Now you can use a nice shallow larger bowl like I did and either fill part way with water or most of the way, or add some rocks or shells in the bottom. Use your imagination!  Then carefully set one or a few floating candles into the water making sure the water doesn’t spill over onto the top of the candle. If it does, just take it out and dry it off and try again. I found that my candles all floated very well except for the mini cupcake shaped one, which didn’t have enough flare at the top so it just sank.

Light your newly made floating soy candles, turn the lights down low and enjoy the ambient glow!

Burn Times

The first batch I made with only votive/pillar soy wax, my little candles didn’t  burn very long and they tunneled, which is why I decided to try a blend of soy waxes. The next batch burned nearly twice as long and didn’t tunnel near as much.  My metal tart mold candle burned for about 3.5 hours the last time (I believe it was 2 hours in the first batch). Some of my smaller/ shallower flower floating candles (flower lolipop molds) that only burned for an hour the first batch, went up to 1.5-2 hours for the second batch.

So using the softer container wax definitely helped. Like I said above, you could try adding more of the container wax than the votive/pillar wax too and it would probably work fine and give an even longer burn time.


Have you made floating candles (whether soy or regular)?

What do  you use for your candle molds? Leave a comment below!

ScentSational Candles Premium Soy Scented Candles

Filed Under: Soy Candle Making Instructions Tagged With: Decorative Candles

How to Make Flameless, Wickless Jar Candles

August 15, 2013 by SoyCandleMakingTime 1 Comment

Candle Warmers Etc. Flameless Warmer
Candle Warmers Etc. Hurricane Candle Warmer Lantern

is very simple. You can use pretty much any jar that can withstand some heat and will fit on a warmer such as Scentsy or any other brand of Candle warmers. I love candles, but I admit, they can be dangerous, especially if you have kids and pets around that could possibly knock over a lit candle. I have an aunt who is married to a fire fighter and he won’t allow burning candles in the house!

So, with that in mind, at Christmas time I wanted to make some soy candles to give to everyone. So I gave my aunt a plugin tart warmer and some homemade soy tarts (or melts). She loved them! I’ve already written about how to make soy tarts, so now I’m going to tell you how to make wickless, flameless jar candles.

All you have to do is use my soy jar candles recipe and just don’t put a wick in the jars! That’s it! I know, easy right? I wish I could make this post longer, but there really isn’t much more to tell you. You can safely put the max amount of fragrance oil in though without worrying about clogging the wick. So for 1lb of soy wax (16oz), you could use up to 10% fragrance load (1.6 oz of fragrance oil).

So there you go! Make beautiful wickless, flameless candles and use them in your Candle warmers and enjoy. Buy some warmers and make some candles for Christmas gifts or any occasion. The cool thing too, is that you can just reuse the jars once the fragrance has gone out. And, I haven’t tried this yet, but I’m sure you could even reuse the soy wax in the jar and just melt it down and add more fragrance oil to it once all of the fragrance has been used up!

Oh, and I guess there is one more thing. If you are using a Candle warmers that heats from the top with a bulb, then when the fragrance is used up, you can pour off the top melted layer and start over with a fresh layer of fragrance!

ScentSational Candles Premium Soy Scented Candles

Filed Under: Soy Candle Making Instructions

How to Make Wax Melts-Soy Wax Tarts-Flameless

May 8, 2013 by SoyCandleMakingTime 19 Comments


Soy wax melts or “tarts” are one kind of wickless/flameless candle. You can use soy wax melts in a tart burner such as Scentsy wickless candles (flameless), or use with a tealight burner (which would not be flameless).  They tend to give off a stronger fragrance than candles with wicks. One of the reasons for this is that you can use more fragrance oil in the tarts since you don’t have a wick to worry about clogging up.  The other reason is that the whole wax melt, melts completely and more quickly, letting out more fragrance than wick candles.

So if you don’t want a burning flame but love the fragrance that a candle gives, then you should try going with wax melts for a wonderful wickless candle. Soy wax melts have the advantage of being made with all natural soy wax and you can make them with many different colors or leave them the natural creamy white color of the soy wax. You can also use either fragrance oils or essential oils. Read more about the difference between fragrance oils and essential oils.

How To Make Soy Wax Melts

Soy Wax Melts

You basically start with the soy votive candles recipe because you will be using soy votive wax so that the wax melts will release easier from the molds.

Follow all the directions for the soy votive candles keeping in mind that 1 soy wax melt, if you are using the metal tart molds, is just a little under 1 oz, so for 12 wax melts, use about 11 oz of soy votive wax and then about 1oz of fragrance or essential oil.

For however much fragrance oil you use, decrease the amount of wax, so like I said, if you need 12 oz to fill 12 tart

molds and you use 1 oz of fragrance oil, then only use 11 oz of  soy wax. You can use a bit more fragrance oil or essential oil if you’d like.

The amount of fragrance oil that soy wax can hold is approx. 10% oil so for 12 oz of wax you would use 1.2 oz of fragrance oil. Essential oil you would usually use less because it tends to be stronger so you could probably even go with about half the amount.

So once the soy wax is heated to 190-200 degrees you can take it off the heat and let it cool to 185 degrees and then add your fragrance oil and dye. Stir well. Pour into molds at 175 degrees. Let cool, usually about an hour and then the wax melts should pop right out!

Use these tarts/melts in a tart warmer and you’ve got a flameless alternative to wick candles!


This wax melt recipe is also included in my new eBook “The Soy Candle Making Book” You can download the book and have everything you need to make amazing soy candles right at your fingertips! No need to go searching around the net for every piece of information!

Click Here to get this incredible book today!


ScentSational Candles Premium Soy Scented Candles

Filed Under: Soy Candle Making Instructions

How To Make Soy Tealight Candles- 8 hour tea lights

May 5, 2013 by SoyCandleMakingTime 4 Comments

Today I’m going to show you how to make these wonderful scented soy tealight candles right at home! Tealight candles are excellent for using in your tealight holders whether for weddings or other special occasions. For weddings, you can even leave them uncolored because the natural color of soy wax is a creamy white.  You can leave out the fragrance oil and make them unscented, in which case you only need to heat the wax up until it is melted completely since there is no worry about making sure the wax is hot enough to incorporate with the fragrance oil and dye.

View the video above to learn how to make tealight candles, or scroll down to read the instructions on this page

These little tea lights will burn up to 7 to 8 hours! Twice as long as Party Lite tealight candles, and even longer than that with the cheap store bought tealights in the metal cups.

I will caution though, that if you plan on burning these in an enclosed holder, you may need to use metal cups because the plastic cups can get too hot and melt. Plastic tealight cups are more for open style holders

 Tealight Candle Supplies

Let’s see what supplies you’ll need: (Check out my list of favorite suppliers)

  • A kitchen scale. Digital is best, but you can use any kitchen scale.
  • A candy thermometer to keep an eye on the temperature.
  • A rubber spatula for stirring the wax
  • A metal pour pot for candle making
  • A metal cooking/sauce pot
  • 1 lb of Soy Container wax
  • 1 oz of candle Fragrance Oil
  • Candle wax dye
  • 20 plastic or metal tealight cups
  • 20 tealight candle wicks

Soy Tealight Candle Making Instructions:

Get the candle making supplies together and set them on wax paper on the work area

Set the tealight cups on the wax paper and place the wicks in them making sure they are standing fairly straight and centered.

Set the Pour Pot on the scale and 0 it out. Pour in 1 lb of the soy container wax.
Place the sauce pot on the stove and pour water into it so that it is about 1 and a half inches deep.

Set the Pour pot with the wax in it, inside the cooking pot and turn stove to medium low.
Place your candy thermometer in the soy wax. Set a timer for 10min to help you keep an eye on the wax and thermometer.

When temperature is 180 degrees, take the pour pot out and set it on the scale again and 0 it out.

Pour into the melted soy wax, 1oz of fragrance oil (by weight) and stir well.
Now add the dye before the wax cools below 165 degrees. If it has already cooled too much, just set the pour pot back into the pan of water and heat it back up to 170-180 degrees.

Stir the dye well and then let the wax sit and cool.

When the soy wax cools down to 95-110 degrees it is time to pour it into the tealight cups. Stir a few times again first.

Slowly pour the soy wax into the tealight cups. Pouring slowly makes sure that you don’t have any air bubbles.

When all the tealight cups are filled (you may have some leftover or it may not quite fill all 20 cups), go around each one and re-center the candle wicks, making sure they are straight again.

Let the soy candles cool preferably at a room temperature of 70degrees or more. (if it’s too cool, colored candles will frost)

Allow the soy tealights to cure for at least 24 hours before burning them for the best fragrance throw. Uncented soy tealights can be burned as soon as they are completely cooled.

Soy Tealight Candle

Want more great soy candle recipes and in depth instruction, troubleshooting, where to buy supplies, finding the right wick and much, much more??

Click HERE to learn about “The Soy Candle Making Book” and what it can do for you!

ScentSational Candles Premium Soy Scented Candles

Filed Under: Soy Candle Making Instructions

How To Make Soy Chunk Candles

May 5, 2013 by SoyCandleMakingTime Leave a Comment


 Want some more awesome soy candle recipes and in depth instruction?

Click HERE to learn about”The Soy Candle Making Book”


Soy chunk candles are made by filling a glass container with chunks of colored, scented wax, and then poured over with another color/scent that will allow the colored chunks to show through when it is set. These are beautifull candles that make some neat colors when the chunks melt together with the overpour color, as well as mingling both scents together as it melts.

How to make soy chunk candles in containers:

First what you will need:

  1. Sharp knife (like a steak knife, smooth bladed)
  2. Scale. Digital scales are best for more precise measurement.
  3. Candy thermometer. These don’t cost much at the store
  4. Rubber spatula that can handle some heat (I’ve used some cheap ones that curled up on me. Nothing horrible, but it’s nice to have ones that don’t curl up from the heat)
  5. 8×8 square metal cake pan lined with wax paper all the way up the sides.
  6. 2 lbs of soy container wax (I get mine from CandleSoylutions in Eugene, Oregon)
  7. Four  8oz glass jars. I prefer the square mason jars, but any canning type jar will work fine.
  8. Double boiler type setup. You can use a pot with about an inch or so of water in the bottom and a metal bowl sitting on top of it. You can also just get a pour pot specifically for candle making and set it inside a pot that has water in the bottom. NEVER heat wax on the stove without water surrounding, or underneath the container of wax!!
  9. 4 CD-18 candle wicks (you can try size 16 too, but the 18’s worked best for me)
  10. 4 wick stickers to secure candle wick to bottom of jars.
  11. 4 long clipits, or twixits bag clips (like the ones from Pampered Chef, or IKEA ). These fit very nicely across the top of the jars with the wick clipped into place so it won’t move while the wax cools. Keeps it nice and centered!
  12.  1oz  Blueberry fragrance oil
  13. 1oz White Cake candle fragrance oil
  14. 7 drops blue and 2 drops black candle dyeBlueberry Muffin Soy Chunk Candle

Directions:

First thing I do is get all my supplies together in one place.  Then go ahead and put water in the bottom of the pot.
Set your melting pot that the wax will go into on the scale and 0 it out. Now pour in your wax until you have 1lb of wax on the scale.

Set the melting pot into the pot of water (or on top of the pot if you have a double boiler set up).

Turn the stove on med low. (If yours goes from 1-10, then set it on about 3 just to make sure it doesn’t get too hot)   Use an electric stove, not gas!

Then put your candy thermometer in the wax and it would be a good idea to set your timer for about 15min. so you remember to check it.

When the wax temp reaches 185-190 degrees, take the melting pot off the stove , set it onto the scale and 0 it out. Then add 1oz (by weight) of blueberry fragrance oil and stir with a rubber spatula ( a good one that can handle the heat!) .

Just give it a few stirs and then add about 7 drops of the blue dye and 2 drops of black dye, and stir until the dye is completely incorporated into the wax.

Now for more waiting! Set your timer for about 15min. again so you remember to check on the wax. Once the wax is cooled to about 95-100 degrees, you should see it starting to get a little slushy looking. Now it is time to pour the cooled soy wax into the 8×8 wax paper lined pan. Use the spatula to help any remaining wax out.  Now for some more waiting hehe. 🙂

Once the wax in the pan has cooled so that the center is still soft, but not liquid at all, just about the consistancy of butter (Use your finger to gently press to see how soft it is) use your sharp knife to cut lengthwise strips however wide you want your squares to be. I usually make my cuts about 3/4″-1″ apart and then after you’ve cut the wax lengthwise, go ahead and make your cuts across, so it is cut into squares.  Now leave the wax to cool completely before breaking them apart. Usually an hour or 2 depending on the room temperature.

In the mean time…..
Set your glass candle containers out, put the wick stickers on the bottom of the metal wick tab and center your wicks in your jars. Push down firmly to be sure the wick sticks nicely.  If the wick stickers aren’t wanting to stick to the jar I always just warm the jars up (on lowest oven setting, or stick each jar in the hot water you used for melting the wax, for a few seconds) and then the wick stickers will stick nice and firm.

Arranging the Soy Chunks/Squares

Now that your squares are cooled, you can gently break them apart.

Now it’s time to arrange your squares. Just place one row of wax chunks around the edge of the container and continue stacking one row on top of the other until you reach about 3/4″ from the top. (for an 8oz candle by weight, you only fill an 8oz mason jar to about 3/4″ from the top). You can also place your jar on the scale and 0 it out, and then place your chunks in the jar until you have 4oz of wax chunks.

Final Over Pour

Now for the final stage! You can start melting the remaining 1lb of soy wax for the over pour just before you arrange the wax chunks in the jars if you want something to do while you wait for the wax to melt.

So just melt your next 1lb of soy wax, just like you did for the chunks the first time. Same temp, measurements and everything. Remember to set your timer so you don’t forget about it!

Once it is melted to 185-190 degrees, take it off the stove and add your 1oz of White Cake candle fragrance oil and stir. You will not use any dye this time, so once the fragrance oil is incorporated well and you don’t see any oils in the wax anymore, then, again, time to wait for the wax to cool! And set your timer 🙂

Let the wax cool to the same temp as above..95-100 degrees.

Now pour about 4 oz into each jar and clip the bag clips onto the wick so that it is firm and centered sitting across the top of the jars.

If you have extra wax shavings or chunks from the soy wax chunks you broke apart, you can sprinkle small pieces onto the tops before they harden for a lovely appearance!

Well, that’s it! That is how to make soy chunk candles. I should be adding some pictures soon!

ScentSational Candles Premium Soy Scented Candles

Filed Under: Soy Candle Making Instructions

  • « Previous Page
  • 1
  • 2

Make Soy Candles You’ll Love!

Get The Soy Candle Making Book

ScentSational Candles Premium Soy Scented Candles

How To Make Soy Chunk Candles

How To Make Soy Jar Candles

How To Make Wax Melts

  • Privacy Policy
  • About
  • Contact

Copyright © 2023 SoyCandleMakingTime.com ·