
A few weeks ago I made a soy pillar candle. “But soy wax is too soft for making pillars” you might say….. Not if you use a soy pillar blend wax. The two kinds that come to mind, Ecosoya PB and American Soy Wax P-100, are both made up of mostly soy wax with some vegetable oil additives (or something like that). So, while they aren’t 100% soy, they are pretty close to it.
I made a couple pillar candles a few months ago after I bought some molds and supplies from Candle Science, and they both turned out pretty well, but this time I wanted to try something different.
First of all, here’s the supply list:
15oz Ecosoya PB soy wax
1oz or up to 1.5oz fragrance oil
3×3.5″ round pillar mold
Metal wick bar
Duct tape
Hot glue or Wick Sticker/Stickum
Spool of Eco 14 wick
Brown liquid candle dye
Scissors
Chocolate mold or candy mold of fall leaves. I got mine at Michaels craft store, but there are also some here on Amazon
I don’t have pictures for the whole process at the moment, so I’m just going to show from when I poured into the mold. I’ll do a separate post on exactly how to make these, but you can just follow the melting directions on the Votive recipe.
Here’s what I did to prepare the mold. I wanted to try and make a cool design on the sides of the pillar candle by using a q-tip to draw with brown dye on the inside of the mold. I was hoping if I let the dye dry a bit before I poured, it would hopefully stay put.

I wanted to do a fall design, so I drew leaves and then wanted a brown ring around the top of the candle (the bottom of the mold)

Then I poured the pillar candle at about 175 and let cool. As soon as I started to pour, I could see that the dye was not going to stay put and it began to sink down to the bottom of the mold. Oh well, I tried! lol We’ll see what it looks like after it cools!


After cooling, I needed to cut the wick and pour a bit more wax in to make the bottom of the candle smooth and cover up the wick (the top of the mold is the bottom of the candle)
Then after sitting overnight, I popped the soy pillar candle out and this is what I found……
Not what I had in mind, but hey, I think it still looks pretty cool! So I then decided to dress it up a bit with some of the extra wax I had left. I added a bit of brown dye to the wax and poured myself some leaf wax melts as you’ll see below:


That odd light colored one was from some extra wax I had from a couple jar candles I made. It got kind of frosted since it was made with container wax and I wasn’t paying too much attention to what temp I poured at.
I used a chocolate mold I found at Michaels craft store. I love how these fall leaf melts turned out! (you can also find these molds, and others like it, here
Then I attached one of the leaves to the soy pillar. Just melted a little wax and used it like glue to put the leaf on.

I just love the way this turned out, and I am planning on doing some for Christmas presents I think! I’m thinking I need to find some snowflake chocolate molds and do the same thing, only with some blue dye and make the snowflakes blue. You could even put some glitter on the snowflakes.
The cool thing about this, is that you can “glue” these melts to the pillar and have a pillar candle, and then when it melts too low, use the melts in a tart warmer (Scentsy, or other type of warmer). If you sell your candles, this might be a great selling point too!
The only thing I didn’t care for, is that the leaf stuck out kind of far. It looks good with just the one leaf, but I think if I were going to put some all the way around, I wouldn’t fill the leaf mold up as much, maybe halfway, so they don’t look so bulky.
So here are pictures of how the candle burned. I really love the way it looks. At some points I tried to do the “hug the candle” thing ( I learned from Parylite) so that you gently squeeze the sides of the candle in closer to the flame so more of it will melt and not just completely tunnel down. You have to be careful with soy pillar candles though because they aren’t as elastic as paraffin wax, therefore you can easily break the sides off instead.
Anyway, so here are pics of it burning:
Flame was a little high at first, but then it settled down after it started melting the wax.
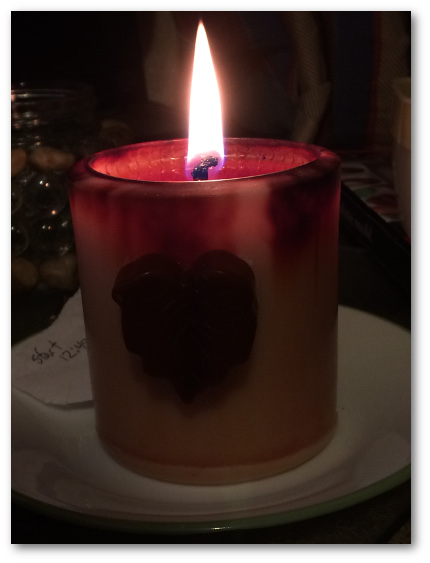
Just thought it looked kind of neat in this picture after the first burn….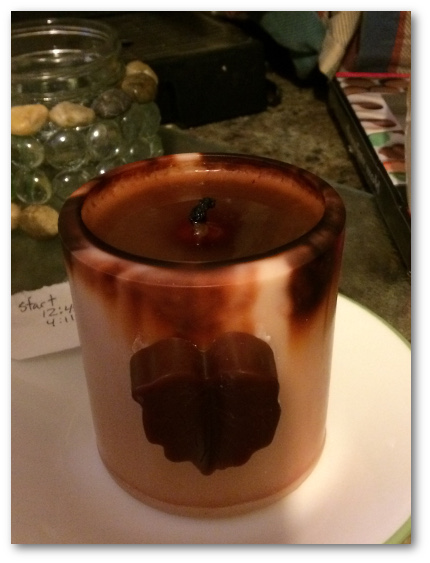

You can see in the picture below, that I “hugged” the sides of the candle. Once it had burned down a ways, and while the sides are soft, I just gently push them toward the flame a bit.


And, then eventually the leaf fell off 🙂 It was bound to happen lol
Had a little bit of a blowout at the end. I let it burn too long (I think about 5 hours or so) and it ended up getting a small hole on one side. It’s okay though. I can always use the rest of the wax in my tart melter. 
Well, that’s my decorative soy pillar candle experiment. It turned out great I think! The candle burned nicely almost all the way down (until I let it go too long that is!) .
Now the big questions…. How long did it burn? About 35 hours. It would have burned longer though if it hadn’t leaked all that wax out toward the end.
How did it smell/hot throw? Well, I used Amarreto Nog from Candle Science. It was kind of a light throw (couldn’t smell it much while it was burning, or even when it wasn’t). I could try using more, but I’ve also heard from another candle maker that Amarreto Nog doesn’t throw well anyway. So next time I will try another fragrance.
That’s it for now! Let me know what you think in the comments!
Well done Melissa. I think your experiment went well. I was going to comment on the thickness of your leafs but you then made your own comment. I agreed. I’m not a big fan of pillar candles myself mainly because of the way they melt and look untidy but I also know there are plenty of people that love this look. I love the way the dye melted to the top. Great effect.
Wow! Thanks for the tutorial and the candle turned out really cool.
I really like this candle. I’ll be trying some in the future, after I get my basics down. Thanks for sharing your ideas with us.
Thank you for this tutorial. I’m going to try this. I think your experiment produced a beautiful and unique gem. Love it!
I love how they turned out! Yes, it would have been super cool if the leaf pattern had stayed but what you got was fab! I wonder if you poured cooler if the leaf pattern would stay?
I have only been making pillars with paraffin because the soy is so tiresome. I created a soy/beeswax blend that worked really well. It is 1lb CC Votive soy/4oz Beeswax/1oz Palm stearic acid. It creates a beautiful candle that you molds in as it burns. Unlike so much of the soy pillar stuff that “blooms” out. Although I do see that the one you used seems to be behaving ok. Until the end with the blow out. But honestly, that was the very end. Maybe I will have to give it another go.
Thanks for posting 🙂
Curious how you made your pillars with your soy blend wax.. I tried it with that ratio and the candle cracked in half and I don’t understand why?
I should add that as I was heating the wax it was bubbling the whole time and once it reached 180 degrees I took it off the heat, so perhaps it was a problem with the air bubbles. Also the mold was ceramic and cool, I didn’t heat it up any before pouring the wax in.
Very nice Fall Candle ! I was also thinking of attaching an embed on a pillar! So I am glad you shared your project idea with us! I would like to see how you do with a white pillar with blue dye and snowflake embed! I bought a tiny Cherub Angel silicone mold to do a wax embed for a Christmas Candle. Should be a FUN Project. I will be using Paraffin though….the Ecosoya Pillar Wax is great EXCEPT when I burned 2 pillars…each time they got a crack along the sides about halfway down. Don’t know why…
Thank you so much for your tutorial!
Beautiful fall candle! I really love the idea of painting the dye in the sides of the mold with a q-tip. That created a really unique look. Great job! Looking forward to more candle experiments.
Thanks!
What if you poured the leaf only half way in the mold so it wasn’t so bulky? I like how this came out. Thanks for sharing!
Yes, that would work fine, and I wish I had thought of that when I made these! lol I did a Christmas candle and poured less wax in some snowflake molds and they turned out perfect. 🙂